
How to clean leather car seats: Leather car seats give your vehicle a premium look and feel, but they require regular care to stay soft, clean, and free from cracks. Over time, dust, body oils, food crumbs, pet hair, and accidental spills can build up on the leather surface, causing stains and premature wear. If these contaminants aren’t removed properly, they can damage the protective finish and shorten the lifespan of your seats.
The good news is that learning how to clean leather car seats is easier than many people think. With the right cleaning products, gentle techniques, and a little routine maintenance, you can remove dirt, restore the leather’s natural appearance, and keep your car interior looking like new. Whether your seats need a quick refresh or a deep clean, this guide covers every step in detail.
In this article, you’ll discover the best way to clean leather car seats, learn how to remove stains from leather car seats, and find out how to condition leather car seats to prevent drying and cracking. By following these expert-approved methods, you can safely clean your leather seats without damaging their finish.
Quick Answer
The safest way to clean leather car seats is to vacuum away loose dirt, wipe the surface with a damp microfiber cloth, clean using a pH-balanced leather cleaner or mild soap solution, gently remove stains, wipe away any residue, allow the seats to air dry, and finish by applying a quality leather conditioner. This simple routine keeps leather clean, soft, and protected from everyday wear.
Why You Should Clean Leather Car Seats Regularly
Regular cleaning is one of the easiest ways to extend the life of your leather seats. Dirt and dust may seem harmless, but tiny particles can act like sandpaper when people slide in and out of the vehicle. Over time, body oils, sweat, food spills, and sunlight can also break down the leather’s protective coating, causing it to fade, dry out, or crack.
Keeping your leather seats clean not only improves the appearance of your vehicle but also helps preserve its value. Routine maintenance prevents stains from setting, reduces unpleasant odors, and keeps the leather feeling soft and comfortable. Spending just a little time cleaning every few weeks can save you from expensive repairs or professional restoration later.
Supplies You’ll Need
Before you begin, gather all of your cleaning supplies in one place. Having everything ready makes the cleaning process smoother and helps prevent unnecessary interruptions.
You’ll need a vacuum cleaner with a soft brush attachment, several clean microfiber cloths, a quality leather cleaner, a leather conditioner, distilled water, mild dish soap, a spray bottle, a soft-bristle brush, and clean dry towels. Using products specifically designed for automotive leather is always the safest option, as harsh household cleaners can damage the leather’s protective finish.
Before You Start
Before applying any cleaner, park your vehicle in a shaded area or garage where the seats remain cool. Heat and direct sunlight can cause cleaning products to dry too quickly, leaving streaks or uneven results. Always test your cleaner on a small hidden section of the seat first to make sure it doesn’t discolor or damage the leather.
It’s also important to avoid soaking the leather with water. Instead, use a slightly damp microfiber cloth and work gently. Never use bleach, ammonia, alcohol-based cleaners, or abrasive scrubbing pads, as these products can permanently damage the leather surface.
Step 1: Vacuum the Leather Car Seats Thoroughly
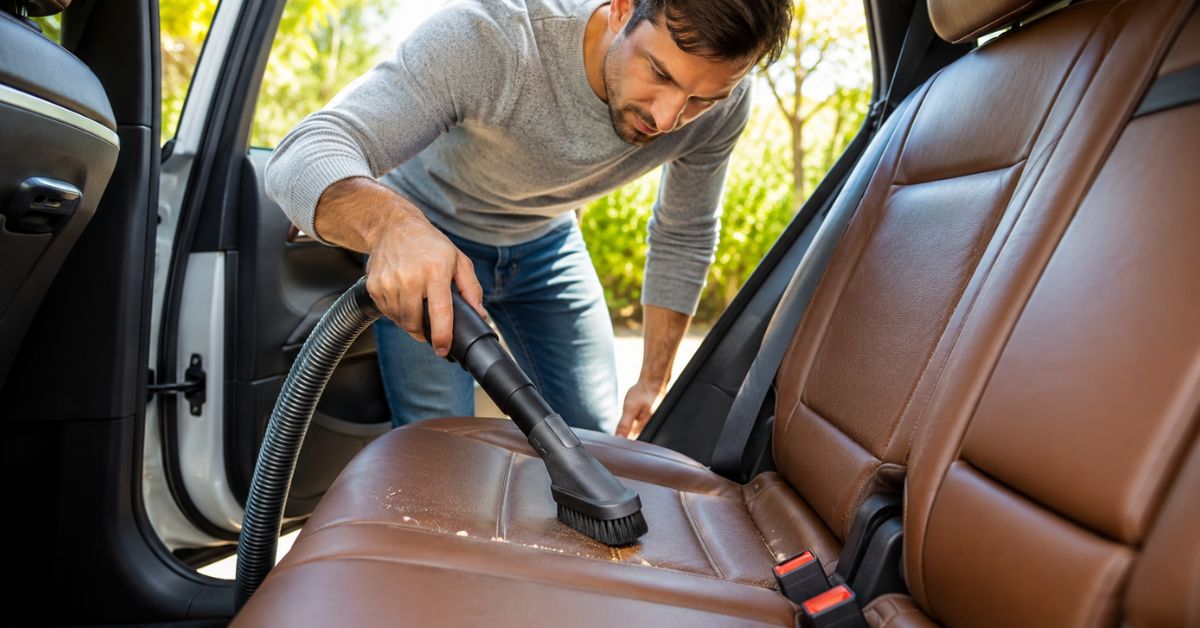
The first and most important step in how to clean leather car seats is removing all loose dirt, dust, crumbs, and debris. Many people skip this step and immediately start wiping the seats with a damp cloth, but doing so can actually scratch the leather. Tiny particles of sand, dirt, and grit become trapped between the cloth and the leather surface, acting like sandpaper and gradually wearing away the protective finish.
Begin by opening all the car doors to improve lighting and ventilation. Using a vacuum cleaner with a soft brush attachment, gently clean the entire seat, including the seat cushions, backrests, headrests, armrests, and side bolsters. Work slowly instead of rushing so the vacuum can lift dirt without dragging it across the leather. If your vacuum has adjustable suction, choose a medium setting to avoid putting unnecessary stress on delicate leather surfaces.
Pay special attention to the seams, stitching, folds, and gaps between the seat cushions. These areas often collect crumbs, dust, pet hair, and other debris that can be difficult to see. For perforated leather seats, avoid pressing the vacuum nozzle directly against the small holes. Instead, hold the soft brush attachment slightly above the surface to safely remove dirt without forcing it deeper into the perforations.
Once you’ve finished vacuuming, inspect the seats under good lighting. If you notice sticky spots, grease marks, ink stains, or heavy buildup, don’t scrub them yet. These stains will be treated safely in the next steps using the proper cleaning method.
Pro Tip: How to Clean Leather Car Seats ?.Use a soft detailing brush to loosen dust from tight stitching and corners while vacuuming. This helps remove hidden debris without scratching the leather.
Step 2: Prepare a Safe Leather Cleaning Solution
After removing all loose dirt, it’s time to prepare a leather-safe cleaner. The best way to clean leather car seats is to use a pH-balanced leather cleaner specifically designed for automotive interiors. These products effectively remove dirt, body oils, and light stains without stripping away the leather’s natural protective coating.
If you don’t have a commercial leather cleaner, you can make a gentle homemade solution by mixing a few drops of mild dish soap with distilled water in a spray bottle or small bowl. Distilled water is recommended because it doesn’t contain minerals that can leave spots or residue on the leather. Avoid using too much soap, as excess detergent can leave a sticky film that attracts more dirt over time.
Never use bleach, ammonia, vinegar on finished leather, rubbing alcohol, hydrogen peroxide, or abrasive household cleaners. While these products may seem effective, they can dry out the leather, cause discoloration, or damage its protective finish. Even natural cleaners should always be tested on a hidden area before being applied to the entire seat.
Instead of spraying the cleaner directly onto the leather, lightly spray it onto a clean microfiber cloth. This gives you better control over the amount of moisture used and helps prevent the leather from becoming oversaturated. Leather should be cleaned with a damp cloth, not soaked with liquid.
Taking a few extra minutes to prepare the right cleaning solution ensures a safer, more effective cleaning process and helps preserve the beauty of your leather seats for years to come.
Warning: Never pour water directly onto leather seats or allow cleaning solution to pool in seams or perforations. Excess moisture can seep beneath the leather and lead to mildew, unpleasant odors, or damage to the seat padding.
Step 3: Wipe the Leather Gently with a Microfiber Cloth
Now that your cleaning solution is ready, it’s time to clean the leather surface. This step plays a major role in how to clean leather car seats because using the right technique removes dirt without damaging the leather’s protective coating.
Lightly dampen a clean microfiber cloth with your leather cleaner or mild soap solution. The cloth should feel slightly damp, not wet. Applying too much liquid can allow moisture to seep into the stitching, seams, or foam beneath the leather, which may lead to mold, unpleasant odors, or long-term damage.
Start at the top of the seat and work your way downward using gentle circular motions. Cleaning from top to bottom prevents dirty water from running over areas you’ve already cleaned. As you wipe, you’ll notice the microfiber cloth lifting away dust, body oils, and everyday grime without scratching the leather.
For heavily used areas such as the driver’s seat, seat edges, armrests, and headrests, apply a little extra attention. These spots often collect more body oils and dirt because they come into frequent contact with hands and clothing. However, avoid scrubbing aggressively. Let the cleaner do the work instead of using excessive pressure.
If the cloth becomes dirty, switch to a clean microfiber cloth before continuing. Reusing a dirty cloth can spread grime back onto the leather and reduce the effectiveness of your cleaning. Professional detailers often use several clean cloths during one cleaning session to achieve the best results.
When cleaning perforated leather seats, wipe gently across the surface without forcing moisture into the tiny holes. Excess liquid inside the perforations can damage the padding underneath or create mildew over time.
Pro Tip: Fold your microfiber cloth into quarters while cleaning. This gives you multiple clean surfaces to use before replacing the cloth, making the cleaning process more efficient.
Step 4: Remove Stubborn Stains Safely
Even with regular maintenance, leather car seats can develop stubborn stains from coffee, soft drinks, food, sunscreen, ink, makeup, or muddy shoes. The key is to treat stains as soon as possible. Fresh stains are much easier to remove than stains that have had time to soak into the leather.
Before applying any cleaner, identify the type of stain you’re dealing with. Different stains require slightly different cleaning methods, but the same rule always applies: never scrub aggressively. Excessive rubbing can wear away the leather’s protective finish and make the stain even more noticeable.
For most everyday stains, apply a small amount of leather cleaner to a clean microfiber cloth and gently blot the affected area. Avoid pouring cleaner directly onto the leather. Instead of rubbing back and forth, use light circular motions and gradually lift the stain. Patience is important, as several gentle passes are much safer than one aggressive scrub.
Grease or oily stains should be blotted immediately with a dry microfiber cloth. Avoid adding water right away, as it may spread the grease further. For ink stains, use a leather-safe ink remover recommended by the product manufacturer, and always follow the instructions carefully. Never use nail polish remover, acetone, or harsh solvents, as they can permanently discolor or damage leather.
If you’re unsure whether a stain can be removed safely at home, it’s better to seek professional detailing rather than risk damaging expensive leather upholstery.
Warning: Never use steel wool, magic erasers, stiff brushes, bleach, or abrasive cleaners on leather car seats. These products may permanently scratch, fade, or strip the leather’s protective coating.
Step 5: Remove Any Cleaning Residue
After you’ve finished cleaning the leather and treating any stains, it’s important to remove any leftover cleaning solution. Even high-quality leather cleaners can leave behind a light residue if they’re not wiped away properly. Over time, this residue may attract dust, make the leather feel sticky, or leave a dull finish.
Take a fresh microfiber cloth and lightly dampen it with distilled water. The cloth should be damp rather than wet, as excessive moisture can soak into the leather and cause damage. Gently wipe the entire seat using smooth, overlapping strokes to remove any remaining cleaner. Pay close attention to seams, stitching, and creases where cleaning solution may collect.
Avoid spraying water directly onto the leather. Instead, always dampen the cloth first. If necessary, rinse the cloth with clean distilled water and repeat the process until the leather feels clean and free of residue. This simple step helps restore the leather’s natural appearance and prepares it for conditioning.
Properly removing soap residue is an important part of the best way to clean leather car seats because it leaves the surface clean without interfering with the conditioner you’ll apply later.
Pro Tip: Replace your microfiber cloth as soon as it becomes dirty. Using a clean cloth helps prevent dirt or leftover cleaner from being spread back onto the leather.
Step 6: Dry the Leather Completely
Once the cleaning residue has been removed, allow the leather to dry completely before applying any conditioner. Drying is often overlooked, but it’s an essential step that helps protect the leather and ensures the conditioner absorbs evenly.
Use a clean, dry microfiber towel to gently blot any remaining moisture from the seats. Avoid rubbing vigorously, as this can create friction and unnecessary wear on the leather’s protective finish. Instead, use light pressure and smooth strokes to absorb moisture.
After towel drying, leave the vehicle doors or windows open for a short time to improve air circulation. Let the seats air dry naturally for about 20 to 30 minutes, depending on the temperature and humidity. Avoid using hair dryers, heaters, or placing the vehicle in direct sunlight to speed up the drying process. Excessive heat can dry out the leather, making it stiff and more likely to crack over time.
Before moving on to the next step, touch the leather lightly to ensure it’s completely dry. Applying conditioner to damp leather can reduce its effectiveness and prevent it from being absorbed properly.
Did You Know? Leather naturally contains oils that keep it soft and flexible. Excessive heat or direct sunlight can cause these oils to evaporate more quickly, leading to premature aging and cracks.
Step 7: Apply Leather Conditioner for Long-Lasting Protection
The final and most important step in how to clean leather car seats is applying a quality leather conditioner. While cleaning removes dirt and stains, conditioning restores moisture that naturally fades over time. This helps keep the leather soft, supple, and resistant to cracking.
Place a small amount of leather conditioner onto a clean microfiber cloth rather than directly onto the seat. Apply the conditioner using gentle circular motions, working on one section at a time. Spread it evenly across the surface, paying extra attention to high-contact areas such as the driver’s seat, seat edges, and armrests.
Avoid using too much conditioner. A thin, even coat is usually all that’s needed. Applying excessive product can leave the leather feeling greasy and attract more dust. After the conditioner has been applied, allow it to absorb according to the manufacturer’s instructions, which is typically 15 to 30 minutes.
Once the conditioner has soaked into the leather, lightly buff the surface with a clean, dry microfiber cloth. This removes any excess product and leaves the leather with a smooth, natural finish instead of an oily shine.
Knowing how to condition leather car seats is just as important as knowing how to clean them. Regular conditioning helps preserve the leather’s flexibility, reduces the risk of cracking, protects against UV damage, and keeps your car interior looking newer for longer.
Expert Tip: For most daily-driven vehicles, condition your leather car seats every 3 to 6 months. If your car is frequently parked outdoors in hot climates, conditioning every 2 to
Best Natural Ways to Clean Leather Car Seats
If you prefer to avoid harsh chemicals, there are several gentle methods you can use to keep your leather car seats clean. While commercial leather cleaners are often the safest choice, natural cleaning solutions can work well for routine maintenance when used correctly. Always test any homemade cleaner on a hidden area first, and remember that natural doesn’t always mean safe for every type of leather.
Mild Dish Soap and Distilled Water
One of the safest homemade cleaning solutions is a mixture of a few drops of mild dish soap and distilled water. This solution is effective for removing light dirt, fingerprints, and everyday grime without damaging the leather’s finish. Dip a microfiber cloth into the solution, wring it out well, and gently wipe the leather using circular motions. Finish by wiping away any residue with a clean damp cloth and drying the seat thoroughly.
This method works best for regular maintenance rather than deep cleaning or heavy stains
Baking Soda for Grease Stains
Baking soda can help absorb fresh grease or oil stains from leather. Sprinkle a very small amount directly onto the stain and let it sit for several hours or overnight. The baking soda will gradually absorb the excess oil. Afterward, gently brush it away with a soft brush or wipe it off with a dry microfiber cloth.
Avoid rubbing baking soda into the leather, as excessive friction may damage the surface. This method is only suitable for oily stains and should not be used as an all-purpose leather cleaner.
Distilled Water for Light Dust
If your leather seats only have a light layer of dust, distilled water alone may be enough. Lightly dampen a microfiber cloth and gently wipe the seats. This simple method removes surface dust without exposing the leather to unnecessary cleaning products.
Never soak the leather or spray water directly onto the seats. Too much moisture can seep into seams and weaken the material over time.
Natural Cleaning Methods to Avoid
Many DIY websites recommend using vinegar, lemon juice, or essential oils on leather, but these products aren’t always safe for finished automotive leather. Vinegar is acidic and can strip away protective coatings, while lemon juice may cause discoloration. Essential oils can also leave greasy residue that attracts dirt.
To protect your vehicle’s interior, stick to products specifically designed for leather or use a mild soap solution for basic cleaning.
Warning: Avoid bleach, ammonia, alcohol, hydrogen peroxide, acetone, and vinegar on finished leather car seats. These substances can permanently damage the leather and shorten its lifespan.
Best Commercial Leather Cleaners
If your seats are heavily soiled or you want professional-quality results, a dedicated leather cleaner is usually the best option. These products are formulated to clean automotive leather while preserving its natural oils and protective coating.
Look for products that are:
- pH-balanced for leather
- Safe for automotive interiors
- Free from bleach and harsh solvents
- Easy to wipe away without leaving residue
- Compatible with finished leather seats
Pair your cleaner with a high-quality leather conditioner for the best long-term results. Cleaning removes dirt, while conditioning restores moisture and helps protect against drying, fading, and cracking.
- Skipping the vacuuming step
- Forgetting to remove cleaning residue
- Allowing cleaner to dry on the leather
- Not applying leather conditioner after cleaning
- Using bleach, ammonia, alcohol, or vinegar
- Leaving the car in direct sunlight while cleaning
- Ignoring spills until they become permanent stains
Avoiding these mistakes will help maintain the leather’s appearance and reduce the need for costly repairs or professional detailing.
Common Mistakes to Avoid When Cleaning Leather Car Seats
Even with the right products, simple mistakes can shorten the life of your leather seats. Avoid these common errors to keep your interior looking its best:
- Using too much water during cleaning
- Spraying cleaner directly onto the leather
- Scrubbing aggressively with stiff brushes
FAQs
Can I use dish soap to clean leather car seats?
Yes, but only for light cleaning. Mix a few drops of mild dish soap with distilled water and use a slightly damp microfiber cloth. Avoid using strong detergents or excessive amounts of soap, as they can leave residue on the leather.
Is vinegar safe for leather car seats?
No. Vinegar is acidic and may remove the protective finish from automotive leather. A pH-balanced leather cleaner is a much safer option.
How to Clean Leather Car Seats?
Blot fresh stains immediately using a clean microfiber cloth. Then use a leather-safe cleaner and gently wipe the area without scrubbing aggressively. Always test any cleaning product on a hidden section first.
How often should I condition leather car seats?
Most experts recommend conditioning leather every three to six months. Vehicles exposed to strong sunlight or extreme temperatures may benefit from conditioning every two to three months.
Can I use baby wipes on leather seats?
It’s generally not recommended. Many baby wipes contain ingredients that may leave residue or affect the leather’s protective coating. Use products specifically designed for leather instead.
What is the best cloth for cleaning leather car seats?
A soft microfiber cloth is the best choice because it lifts dirt effectively without scratching the leather surface.
Can I steam clean leather car seats?
Steam cleaning is not recommended for most finished leather car seats. Excessive heat and moisture can weaken the leather and damage its protective coating.
Conclusion
Learning how to clean leather car seats isn’t complicated when you follow the correct steps. By vacuuming away loose dirt, using a gentle leather cleaner, wiping with a microfiber cloth, removing stains carefully, drying the seats properly, and applying a quality leather conditioner, you can keep your car’s interior looking clean, soft, and well-protected.
Routine maintenance not only improves the appearance of your vehicle but also helps prevent cracking, fading, and expensive repairs. A few minutes of care every month can significantly extend the life of your leather seats while maintaining their premium look and feel.
Whether you’re performing routine maintenance or tackling stubborn stains, following these seven simple steps will help you clean leather safely and confidently. With the right products and techniques, your leather car seats can stay comfortable, attractive, and protected for many years to come.








Leave a Reply